Creating a CRUD app with Java Spring Boot
I am a software developer and project manager; passionate about solving problems through IT.
Java is a multi-platform, object-oriented, and network-centric language. Spring Boot is an open-source Java-based framework used to create a microservice. It provides a good platform for Java developers to develop stand-alone and production-grade spring applications.
This tutorial aims to walk through building a Spring Boot Rest CRUD(Create-Read-Update-Delete) API using Java Spring Boot. REST APIs serve as a middleman between the backend server and the frontend/mobile application.
Learning Objectives
At the end of this tutorial, you should be able to understand and independently carry out the following:
Initialize a new Spring Boot application with the relevant dependencies
Implement business logic
Work with test/mock data
Use Postman to test your application
Dependencies
Java Development Kit (JDK) 8 or higher
An IDE (e.g. IntelliJ, Eclipse). I’ll be using IntelliJ
Terminal or cmd
Major headings
Generate a New Spring Boot Gradle Project with Spring Initializer
Set up the project
Create the Movie model
Create the Movie service
Create the Movie controller and routes
Run and test the app using Postman
Generate a New Spring Boot Gradle Project with Spring Initializer
Spring Initializer is an easy way to get started with your spring boot application.
Open up your browser and load https://start.spring.io/
Choose "Maven" as the project
Choose "Java" as the language
Add Spring Web and Lombok as dependencies
Choose the Java version you have installed on your system
Leave other configurations as they are
Click on the Generate button to download the project as a zipped file
Extract the zip file and open the project in an IDE
Sync the dependencies with Maven. Although, this might happen automatically.

Create the Movie Model
The data model is represented as Java classes and as database tables. The business logic of the system is done by the Java objects while the database provides permanent storage for the objects.
We will start by creating a models package in our root project package com.example.demo.
Within the models package created above, create a Java class with the name Movie with the fields as shown below.
@Data
public class Movie {
    private Integer id;
    private String name;
    private String description;
    private String genre;
}
Although, the @Data annotation from Lombok encapsulates the creation of the constructor, getters & setters, and the toString() method.
A constructor is a block of code that’s called when an instance of an object is created.
Getters and setters are the class methods used to manipulate the data of the class fields. The getter is used to read or get the data of the class field whereas the setter is used to set the data of the class field to some variable.
The toString() is an in-built method in Java that returns the value given to it with the string format.
This is the full Movie class if you were to include the above methods.
package com.example.demo.models;
import lombok.Data;

@Data
public class Movie {
    private Integer id;
    private String name;
    private String description;
    private String genre;

    public Movie() { }

    public Movie(Integer id, String name, String description, String genre) {
        this.id = id;
        this.name = name;
        this.description = description;
        this.genre = genre;
    }

    public Integer getId() {
        return id;
    }

    public void setId(Integer id) {
        this.id = id;
    }

    public String getName() {
        return name;
    }

    public void setName(String name) {
        this.name = name;
    }

    public String getDescription() {
        return description;
    }

    public void setDescription(String description) {
        this.description = description;
    }

    public String getGenre() {
        return genre;
    }

    public void setGenre(String genre) {
        this.genre = genre;
    }

    @Override
    public String toString() {
        return "Movie{" +
                "id=" + id +
                ", name='" + name + '\'' +
                ", description='" + description + '\'' +
                ", genre='" + genre + '\'' +
                '}';
    }
}
Create the Movie Service
A service contains an interface or abstract class that defines the functionalities it provides. We, however, won’t be creating an interface, we’ll go straight to define the functionalities.
In the root package of our application create a package with the name services. In the services package created above, create a called MovieService.
As opposed to setting up a database, we’ll be using dummy data which we’ll store in an ArrayList.
package com.example.demo.services;

import com.example.demo.models.Movie;
import java.util.ArrayList;
import java.util.List;

public class MovieService {
    //list of movies
    private List<Movie> movies;

    private static MovieService instance = null;
    public static MovieService getInstance(){
        if(instance == null){
            instance = new MovieService();
        }
        return instance;
    }


    public MovieService(){
        movies = new ArrayList<Movie>();
        movies.add(new Movie(1, "Avengers: End game", "A team of super heroes try to restore the world after half its population was wiped off.", "Science Fiction"));
        movies.add(new Movie(2, "Mr & Mrs Smith", "A couple paired to kill each other", "Action"));
        movies.add(new Movie(3, "Black is King", "A musical movie compiled from songs from The Lion King Movie", "Motion Picture"));
        movies.add(new Movie(4, "Reign", "The life of Mary, Queen of Scot", "History"));
        movies.add(new Movie(5, "Enola Holmes", "Enola Holmes goes on a journey to find her missing mother", "Adventure"));
    }

    // return all Movies
    public List<Movie> fetchMovies() {
        return movies;
    }

    // return Movie by id
    public Movie getMovieById(int id) {
        for(Movie m: movies) {
            if(m.getId() == id) {
                return m;
            }
        }
        return null;
    }

    // create Movie
    public Movie createMovie(Integer id, String name, String description, String genre) {
        Movie newMovie = new Movie(id, name, description, genre);
        movies.add(newMovie);
        return newMovie;
    }

    // update Movie
    public Movie updateMovie(Integer id, String name, String description, String genre) {
        for(Movie m: movies) {
            if(m.getId() == id) {
                int movieIndex = movies.indexOf(m);
                m.setName(name);
                m.setDescription(description);
                m.setGenre(genre);
                movies.set(movieIndex, m);
                return m;
            }
        }
        return null;
    }

    // delete movie by id
    public boolean delete(int id){
        int movieIndex = -1;
        for(Movie m: movies) {
            if(m.getId() == id) {
                movieIndex = movies.indexOf(m);
                continue;
            }
        }
        if(movieIndex > -1){
            movies.remove(movieIndex);
        }
        return true;
    }
}
Create the Movie Controller
The controller is where the main business logic is implemented.
In the root package of our project create a package with the name controllers. In the controllers package we created above, create a Java class with the name MovieController.
package com.example.demo.controllers;

import com.example.demo.models.Movie;
import com.example.demo.services.MovieService;
import org.springframework.web.bind.annotation.*;

import java.util.List;
import java.util.Map;

@RestController
@RequestMapping("api/movies")
public class MovieController {
    MovieService movieService = MovieService.getInstance();

    @GetMapping("")
    public List<Movie> getMovie() {
        return movieService.fetchMovies();
    }

    @GetMapping("/{id}")
    public Movie getMovieById(@PathVariable String id){
        int movieId = Integer.parseInt(id);
        return movieService.getMovieById(movieId);
    }

    @PostMapping("")
    public Movie create(@RequestBody Map<String, String> body){
        int noOfMovies = movieService.fetchMovies().size();
        int movieId = noOfMovies + 1;
        String name = body.get("name");
        String description = body.get("description");
        String genre = body.get("genre");
        return movieService.createMovie(movieId, name, description, genre);
    }

    @PutMapping("/{id}")
    public Movie update(@PathVariable String id, @RequestBody Map<String, String> body){
        int movieId = Integer.parseInt(id);
        String name = body.get("name");
        String description = body.get("description");
        String genre = body.get("genre");
        return movieService.updateMovie(movieId, name, description, genre);
    }

    @DeleteMapping("/{id}")
    public boolean delete(@PathVariable String id){
        int movieId = Integer.parseInt(id);
        return movieService.delete(movieId);
    }
}
All words prefixed with @ are called Annotations. An annotation is a form of metadata that provides data about a program. In other words, annotations are used to provide supplemental information about a program.
@RequestController indicates that the class can process HTTP requests.
@RequestMapping(“api/movies”) sets the base path/route for all request endpoints within the controller
@GetMapping indicates the method can process GET requests
@PostMapping indicates the method can process POST requests
@PutMapping indicates the method can process PUT requests
@DeleteMapping indicates the method can process DELETE requests
Run and test the app using Postman
Let’s run the application. Go to the DemoApplication class in the root folder and click on the play button to the left.
Launch Postman and let’s start testing.
Get all movies
Make a GET request to http://localhost:8080/api/movies to return the array of all movies.

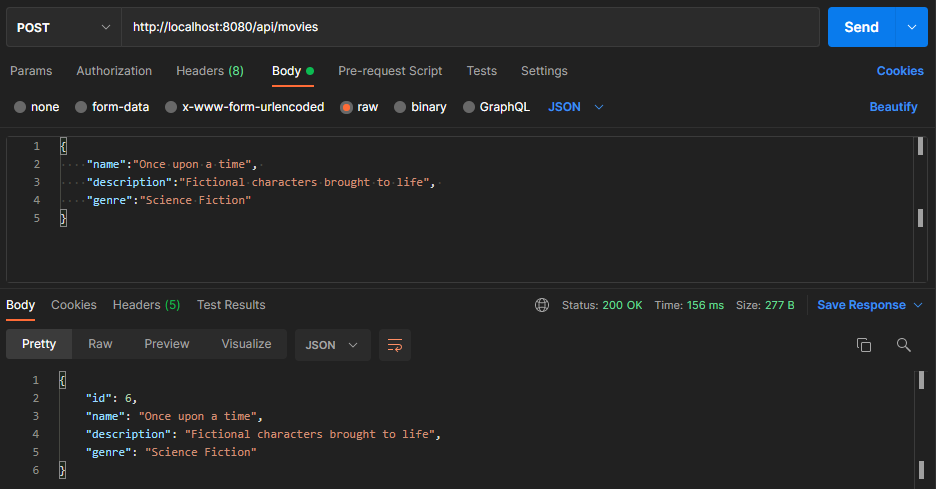
Create a new movie
Make a POST request to http://localhost:8080/api/movies
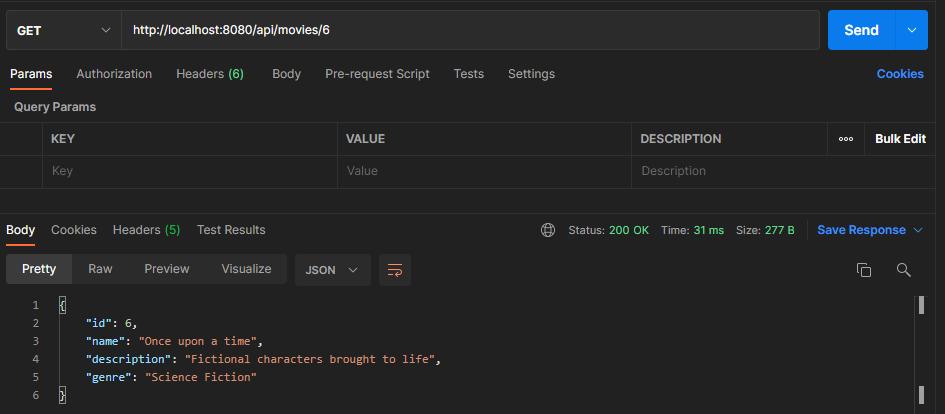
Get a movie by ID movie
Make a GET request to http://localhost:8080/api/movies/{id}
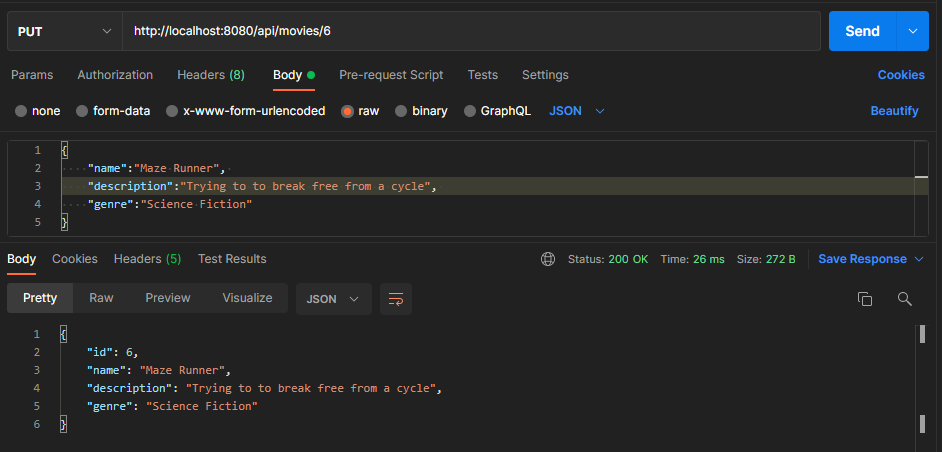
Update a movie by ID movie
Make a PUT request to http://localhost:8080/api/movies/{id}
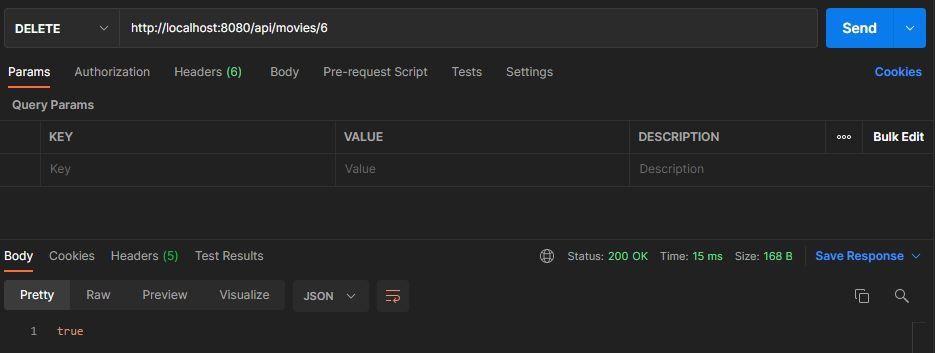
Delete a movie by ID movie
Make a PUT request to http://localhost:8080/api/movies/{id}
That's a wrap. Go ahead and create your first Springboot application.
As an enhancement, you can connect to a database for data persistence.
Resources
If you like this article, feel free to comment and share. You can also reach out to me on Twitter | LinkedIn | Github
Ciao👋🏼