# How to send emails in your Node.js app using Nodemailer and Mailtrap
In this article, we will be covering the basics of sending emails from your Node.js using nondemailer and mailtrap.
## **Pre-requisite**
1. A mailtrap account (You can create one [here](https://mailtrap.io/) )
2. Node.js
Now that that's set-up. Let's get to it
## **Set-up your code and install the dependencies**
1) Create a folder that you want to work in and cd into it
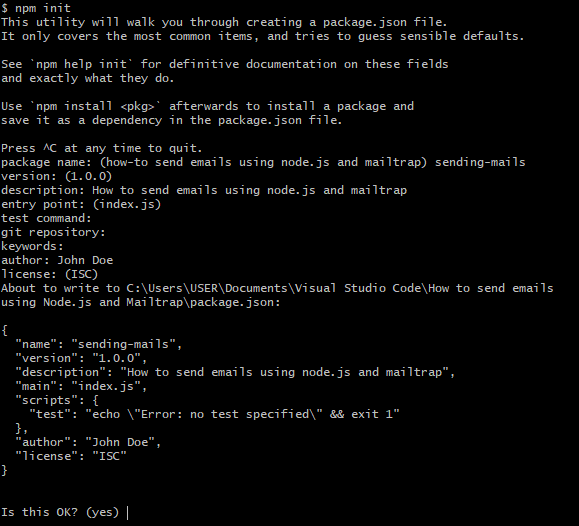
2) Create a package.json file by running ```npm init ``` . Provide answers to the question as seen in the picture below
3) Install the following dependencies- body-parser, dotenv, express
4) Install nodemon as a dev dependency
5) Edit your package.json file and add the following to your scripts
```
"start": "node server.js",
"dev": "nodemon server.js"
```
Set up your index.js file
```
const bodyParser = require('body-parser');
const express = require('express');
const dotenv = require('dotenv');
const app = express();
dotenv.config();
app.use(bodyParser.urlencoded({ extended: false }));
app.use(bodyParser.json());
const PORT = process.env.PORT || 4000;
app.listen(PORT, () => console.log(`Server listening on port ${PORT}`));
module.exports = { app };
```
## **Set-up your mailtrap.io account and get the keys**
1. Go the settings page and take note of the 4 credentials for the Node.js integration
2. Add the credentials to your ```.env``` file
## **Sending mails**
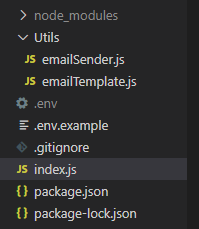
The folder structure
```
const nodemailer = require('nodemailer');
module.exports = {
sendEmail: async (options) => {
const transporter = nodemailer.createTransport({
host: process.env.SMTP_HOST,
port: process.env.SMTP_PORT,
auth: {
user: process.env.SMTP_USER,
pass: process.env.SMTP_PASSWORD,
},
});
const message = {
from: `${process.env.SENDER_NAME} <${process.env.SENDER_EMAIL}>`,
to: options.email,
subject: options.subject,
html: options.message,
};
await transporter.sendMail(message);
},
};
```
Create your email body. This can either be a snipped of HTML code (e.g. ` Hello there
`) or an entire HTML page. We'll be using the later.
```
exports.message = async () => {
const html = ` Greetings
Hello there. How are you?